How to Install Radiant Barrier
A Brief Introduction to Radiant Barriers
Sustainable living practices have become a primary focus for the modern homeowner. This shift has sparked a rise in radiant barrier installation. If you’re among the many property owners eager to cut back on unnecessary energy expenditure, Westside Drywall & Insulation is here to help you discover how to install radiant barrier insulation.
The Role of Radiant Barrier Insulation
Radiant barrier insulation is an innovative approach to optimizing your home’s thermal performance. These products use reflective technology to deflect heat transfer and flow. Particularly advantageous when incorporated into attics and other upper-level rooms, radiant barrier installation is the key to improved energy efficiency and long-term cost-savings on utility bills.
Radiant Barrier Insulation Features
Radiant barrier insulation may seem like an unnecessary addition. However, if you’re looking to reduce your energy bills, these foil-like applications can unlock remarkable savings and a wealth of benefits including:
- Maximized energy efficiency
- Reflect approximately 97% of radiant heat exposure
- Year-round indoor temperature consistency
- Moisture-resistant and durable
- Sustainable and eco-friendly contributing to a minimized carbon footprint
Understanding Radiant Barrier Installation Options
Catering to properties of all types, radiant barrier insulation can be installed in several ways. However, not every approach will be suitable for your home. To ensure the effectiveness of your investment, it’s important to fully understand your options and work with a professional to determine the best course of action for your radiant barrier.
Installing Radiant Barrier Over Existing Insulation
If your current insulation is in good condition, a complete upgrade may not be cost-effective. To improve your home’s thermal performance without breaking the bank, consider incorporating a radiant barrier into your existing insulation framework. This involves covering the insulation between the roof rafters and ceiling with two radiant barrier sheets.
Installing Radiant Barriers Against Rafters
Regions prone to extreme heat need additional thermal protection. That’s where radiant barriers come in. This reflective foil insulation can be installed against the bottom of your roof rafters to boost indoor temperature regulation and deter excessive energy costs.
Leave Installation to the Professionals
Radiant barrier installation may seem simple in theory. However, it requires careful attention to detail and specific tools and techniques. To avoid damage to your property, these projects are best left to the professionals, such as our team at Westside Drywall & Insulation.
Step-by-Step Radiant Barrier Installation Process
While typically not recommended, DIY radiant barrier installation is not impossible. If you’re confident in your ability to take on this process alone, Westside Drywall & Insulation is here to set you up for success. We’ve compiled a step-by-step checklist to help you achieve high-performance, long-lasting radiant barrier insulation results.
Evaluate Your Attic Space
Before diving into equipment and labor, evaluate your attic to determine whether your space is suitable for radiant barrier installation. Issues such as moisture intrusion, poor ventilation, or structural degradation must be addressed prior to installing radiant barriers. Once these tasks are satisfied, measure and take note of your attic’s dimensions to determine your material requirements.
Secure the Appropriate Materials & Tools
Once you’ve secured your measurements, it’s time to collect the materials you will need to pull off the project. To cover all your bases, we recommend the following:
- Radiant barrier material
- Scissors, box cutter, or utility knife
- Measuring tape
- Safety gear, including protective goggles
- Staple gun
- Sturdy ladder
- Spray applicator or adhesive
Prioritize Safety
Attics are typically dimly lit. To reduce the risk of hazards during radiant barrier installation, prioritize safety by employing the necessary precautions, including:
- Secure a reliable light source, such as a heavy-duty flashlight or battery-operated utility light
- Clear away clutter and trip-hazards
- Shut off nearby power sources
- Open windows or use a fan for proper ventilation
Choose Your Radiant Barrier Installation Method
Depending on the structure of your property and your budget, there are three radiant barrier installation methods to choose from. These options include:
- Stapling method
- Foil-faced insulation board method
- Spray-on method
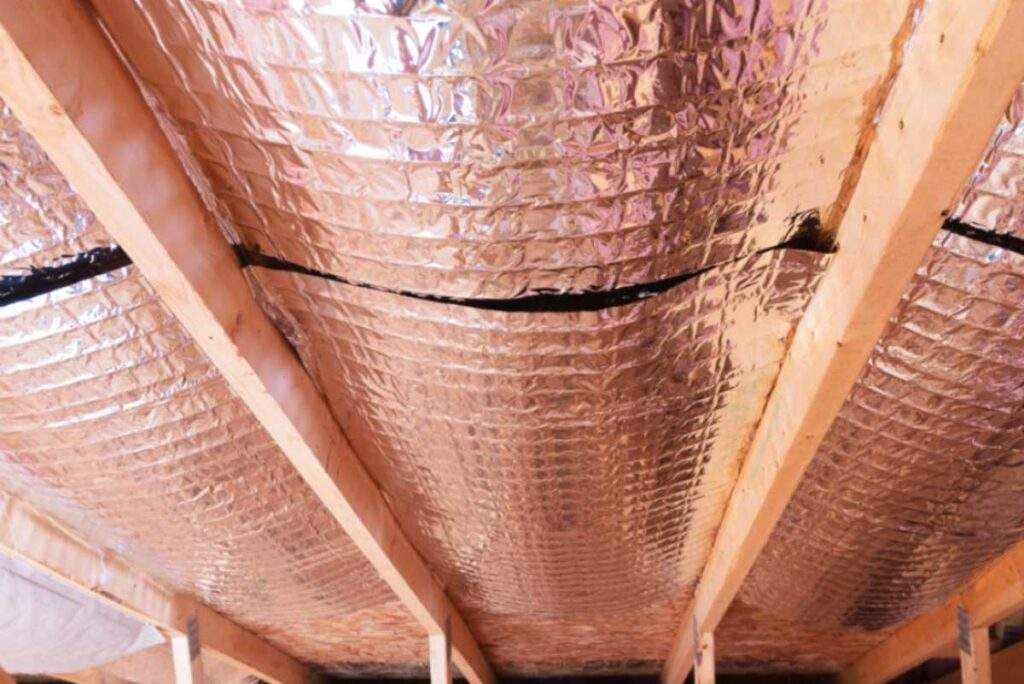
Stapling Method
Stapling radiant barrier installation is fairly straightforward and, therefore, the most popular choice. This method involves installing radiant barrier materials in overlapping layers directly underneath your roof rafters using a staple gun. This method is typically a two-person job as you face the risk of gaps, sagging, and/or compressed insulation materials if you don’t have adequate assistance.
Foil-Faced Insulation Board Method
In contrast to loose materials, the foil-faced insulation board method involves installing reflective, radiant barrier sheets. Slightly more expensive than stapling, this approach is among the most effective ways to create a durable barrier against heat transfer. As these boards must be custom-cut, foil-faced insulation can be used for virtually any property type.
Spray-On Method
The spray-on radiant barrier installation is a modern alternative to standard application methods. This process involves coating the underside of the roof decking using a spray-on radiant barrier agent. Eliminating the need for added materials, a spray-on radiant barrier is a liquid that hardens into a robust shield as it dries and cures, integrating into your attic’s supportive structures.
Call to Learn More About Radiant Barrier Insulation
If you’re ready to experience the transformative power of radiant barrier insulation, you’ve come to the right place. Get ahead of problematic temperature fluctuations and elevated utility bills with Westside Drywall & Insulation. Contact us today to learn more about installing radiant barrier insulation in your home.